


Your Child Builds Real Smart Devices — In Just 45 Days.

16 hands-on Arduino labs across 45 days

70% practical, 30% theory — every concept reinforced with a real circuit

Industry-grade Arduino UNO + sensor kit included

Recognized Module Completion Certificate from Elysium Embedded School

Capstone project — a working Smart Farm Mini Station the child takes home
Program Highlights
Start Your Learning Journey With Confidence
- Course Overview
- Course Objectives
- Learning Outcomes
- Who Should Enroll
- Course Features
- Industry & Career Connect
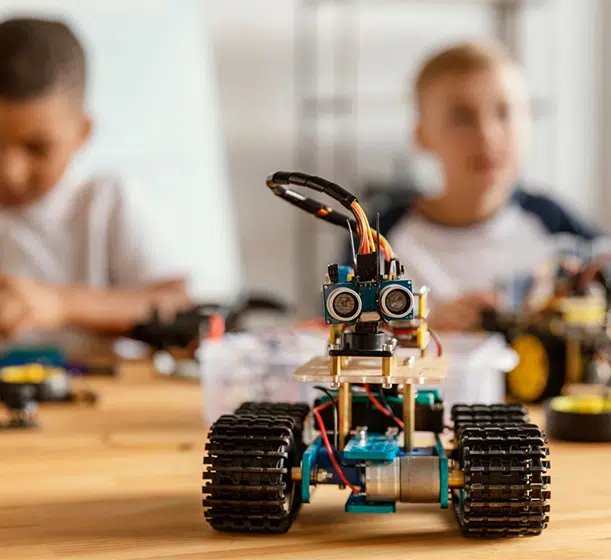
Module 3 of the Electrobot Junior program — Arduino Programming and Sensor Integration — is the inflection point in your child's STEM journey. The first two modules built the muscle: an instinct for circuits, a feel for logic, the patience to debug. This module hands them the brain. The Arduino UNO microcontroller is the heart of the curriculum, and from day one, every concept lands in working hardware on a breadboard.
Forty-five carefully structured days take a student from the very first Blink sketch to a fully functional Smart Farm Mini Station that monitors soil, weather, and light, and takes its own decisions. Along the way, they wire and code sixteen lab experiments, ship three mini projects with real-world themes — agriculture, transport, manufacturing — and end the module with a capstone they can demo to their parents, their teachers, and themselves.
Why This Module Matters
Most kids today know how to use technology. Very few know how to make it obey them. Module 3 closes that gap. Once a student can write Arduino C, read a sensor, and trigger an actuator, the entire world becomes programmable in their eyes. A door becomes something that can open by itself. A pot becomes something that can ask for water. A traffic light becomes something they can redesign. That mental shift — from consumer to creator — is the single most valuable thing this module delivers.
Industry Relevance
The exact skills practiced here — Arduino C syntax, sensor calibration, actuator control, Serial Monitor debugging — are the foundational layer of every Industry 4.0 system being built in 2026, from precision-agriculture rigs in Punjab to AGV fleets in Chennai warehouses. Companies don't hire 12-year-olds, of course. But the engineers they will hire five and ten years from now are being made in classrooms exactly like this, on hardware exactly like this.
The Beginner-to-Builder Journey
Week 1 starts with the question: what is a microcontroller? Week 2 has them blinking LEDs in patterns. Week 4 introduces sensors. Week 6 introduces motion. Week 8 combines everything. Week 9 puts the entire toolkit into a capstone build. The progression is intentional, gradual, and always anchored to something the child can physically see working on their bench.
Real-World Use Cases Embedded in the Curriculum
| Industry | Concept in the Module | Real Project It Mirrors |
|---|---|---|
| Agriculture | Soil moisture + DHT11 monitoring | Precision-farming sensors in commercial greenhouses |
| Smart City | Ultrasonic distance + servo automation | Automated waste bins in airports and metros |
| Transport | Traffic-light state machine on Arduino | Smart-junction controllers in tier-1 cities |
| Manufacturing | Sensor-triggered actuator logic | Conveyor counters and quality-gate sensors |
| Home Automation | LDR + LED + buzzer integration | Smart-home occupancy and lighting controllers |
By the end of Module 3, every student will be able to do — not just describe — the following. These objectives are action-driven and directly testable in the lab assessment.


Technical Skills
- Write, compile, and upload Arduino C sketches independently.
- Read analog sensor values via analogRead() and process them with thresholds.
- Implement PWM for analog-style output with analogWrite().
- Use the HC-SR04 ultrasonic sensor with pulseIn() to measure distance in centimetres.
- Use the DHT library to read temperature and humidity from a DHT11 sensor.
- Use the Servo library to control angular position with 1-degree precision.
- Drive DC motors forward, reverse, and at variable speeds using an L293D / L298N.
- Use Serial.begin(), Serial.print(), and Serial.println() for live debugging.
- Combine multiple sensors and actuators into a single coherent control loop.
Practical Skills


Industry Readiness


Portfolio Readiness
- Sixteen documented lab experiments with photographs and observations.
- Three completed mini-projects with bill-of-materials and demo videos.
- One full capstone project — the Smart Farm Mini Station — with poster and pitch.
- A lab notebook signed by the trainer for each module milestone.
- Module 3 Completion Certificate from Elysium Embedded School.
Module 4 is designed specifically for school students who have completed Modules 1, 2 and 3 of Electrobot Junior, or for advanced beginners with equivalent foundation knowledge. It is ideal for:
| Audience Type | Why This Module Fits Them |
|---|---|
| School students (Class 5–9) | Children aged 10 to 14 who are ready to take their Arduino skills into the world of moving, sensing, autonomous machines. |
| Curious beginners | Students who love taking things apart, building with LEGO, or asking 'how does that work?' — this module gives that curiosity a serious technical outlet. |
| Aspiring engineers and innovators | Children whose parents already see a future in engineering, deep-tech or entrepreneurship and want a structured early start. |
| STEM olympiad and competition aspirants | Students preparing for school robotics competitions, science fairs and innovation showcases. |
| Homeschooled and progressive-school learners | Families whose education philosophy centers around experiential, project-based learning that goes beyond textbooks. |
| Parents seeking screen-time alternatives | Parents who want their child engaged in something challenging, creative and hands-on instead of passive screen consumption. |
Module 3 is a foundation, not a hiring credential. But it builds the exact mindset, vocabulary, and hand-eye competence that the industry will reward a decade later. The block below lays out where this skillset eventually leads.
Market Demand Snapshot


Future Job Roles This Module Plants the Seed For
- Embedded Systems Engineer
- IoT Solutions Engineer
- Robotics Engineer
- Drone Application Developer
- Industrial Automation Engineer
- Smart Agriculture Technologist
- Edge AI / TinyML Engineer
- Hardware Product Engineer
- Firmware Engineer
- Mechatronics Engineer
- Smart City Systems Engineer
- Automotive Embedded Engineer
- Hardware Startup Founder
- Industry 4.0 Solutions Architect
- Defense Electronics Engineer
- Wearables Engineer
- Cold-Chain & Logistics Tech Engineer
- EdTech Hardware Designer
Industries That Eventually Hire This Profile
| Industry | Where This Skillset Lands |
|---|---|
| Automotive | ADAS, EV battery management, infotainment, telematics. |
| Agriculture & FoodTech | Precision sensors, smart irrigation, cold-chain monitoring. |
| Smart Cities & Urban Tech | Smart lighting, traffic, waste, water and parking systems. |
| Healthcare & MedTech | Wearables, patient monitors, lab automation. |
| Defense & Aerospace | Surveillance robotics, drones, secure embedded systems. |
| Manufacturing | Industrial IoT, predictive maintenance, AGVs. |
| Energy & Utilities | Smart meters, grid sensors, solar monitoring. |
| Consumer Electronics | Smart home, audio, gaming peripherals. |
Career Pathway - From This Module Onwards
| Stage | Program | Outcome |
|---|---|---|
| School Foundation | Electrobot Junior Modules 1–2 | Electronics fundamentals + Scratch programming |
| School Bridge (You Are Here) | Electrobot Junior Module 3 | Arduino programming + sensor integration mastery |
| School Advanced | Electrobot Junior Module 4 | Beginner robotics & innovation capstone |
| School Advanced+ | Electrobot Senior | IoT, drones, wireless, product development |
| College Foundation | Embedron | Industry-track embedded, IoT, robotics, automation |
| College Advanced | Embedron+ | RTOS, Embedded Linux, Edge AI, autonomous robotics |
| Industry Track | EmbedX | Working-professional certification in advanced applications |
The Beginner → Intermediate → Advanced Roadmap
| Stage | What the Student Can Do | Typical Age Window |
|---|---|---|
| Beginner | Light LEDs, read a button, blink Arduino | 10–12 yrs |
| Intermediate (Module 3 finish) | Read sensors, drive actuators, build prototypes, debug | 12–14 yrs |
| Advanced (Module 4 + Senior) | Build autonomous robots, IoT systems, drones | 13–16 yrs |
| Pre-Professional (Embedron) | Design industry-grade embedded products | 17+ yrs |
Future Technology Roadmap
Emerging Fields Within Reach
- TinyML & Edge AI — running ML on microcontrollers like ESP32-S3.
- Connected mobility — V2X, telematics, EV firmware.
- Precision agriculture — sensor-driven farms with drone overflights.
- Autonomous robotics — warehouse, delivery, defense, surgical.
- Smart wearables — health, fitness, hearing, vision augmentation.
- Industrial IIoT — predictive maintenance, machine vision, digital twins.
| What We Teach Now | Where It Leads — 2 to 10 Years Out |
|---|---|
| Arduino UNO + sensors | ESP32, STM32, Embedded Linux, Zephyr, RTOS |
| Soil moisture + DHT11 + LDR | Precision agriculture, AgriTech, drone-based spraying |
| Ultrasonic + servo + DC motor | Autonomous vehicles, ADAS, SLAM, industrial AGVs |
| Serial Monitor debugging | Logic analyzers, oscilloscope-based firmware debugging |
| analogRead / analogWrite (PWM) | Sensor fusion, DSP basics, motor control algorithms |
| Servo control + L293D | Robotic arms, CNC, articulated robotics, drones |
| if-else state machines | Embedded firmware design, FSMs, real-time scheduling |
| Arduino C basics | C/C++ for embedded, MISRA standards, RTOS APIs |
| Capstone documentation | Product engineering, PRDs, hardware startup founding |
Detailed Syllabus — Module 3
Module Information Snapshot
| Module Number | 3 |
|---|---|
| Module Name | Arduino Programming & Sensor Integration |
| Duration | 45 Days | 67.5 Contact Hours |
| Daily Session | 1.5 Hours |
| Learning Level | Intermediate Beginner |
| Mode | Instructor-led, Hands-on Lab |
| Recommended Age | 10–14 Years |
| Theory : Practical | 30 : 70 |
Weekly Curriculum Map
| Week | Theme | Key Topics | Practical Focus |
|---|---|---|---|
| Week 1 | Welcome to Arduino | Microcontroller intro, Arduino UNO board tour, IDE setup | First Blink program |
| Week 2 | Digital I/O | Digital pins, pinMode, digitalWrite, digitalRead | LED patterns, button-controlled LED |
| Week 3 | Analog & PWM | analogRead, analogWrite (PWM), serial output | LED fade, light-controlled brightness |
| Week 4 | Time & Logic | delay, millis, loops, conditionals in Arduino C | Traffic light controller, reaction game |
| Week 5 | Distance Sensing | Ultrasonic (HC-SR04), IR sensor | Smart bin lid, obstacle warning system |
| Week 6 | Environment Sensing | Soil moisture, DHT11 temp/humidity, LDR | Smart farm monitor, weather logger |
| Week 7 | Motion & Output | Servo motor, DC motor + L293D, buzzer with tones | Servo gate, automatic curtain |
| Week 8 | Combining It All | Multi-sensor systems | Smart home model, smart farm model |
| Week 9 | Capstone Build & Showcase | Project planning, build, polish, demo | Module 3 capstone & demo day |
Day-Wise Topic Plan (Summary)
| Days | Topic | Hands-On Activity |
|---|---|---|
| 1-2 | What is a Microcontroller? | Board tour activity |
| 3-5 | Arduino IDE Setup | First Blink sketch |
| 6-8 | Digital Output | LED patterns, knight rider |
| 9-11 | Digital Input | Button-controlled LED |
| 12-14 | Analog Input | Potentiometer-controlled LED |
| 15-17 | PWM Output | LED fade, brightness control |
| 18-20 | Serial Monitor | Live data display |
| 21-23 | Conditionals in Arduino | Light-based switch |
| 24-26 | Loops in Arduino | LED chaser pattern |
| 27-29 | Ultrasonic Sensor | Smart bin lid |
| 30-32 | IR Sensor | Obstacle alarm |
| 33-35 | Temperature & Humidity | Weather mini logger |
| 36-37 | Soil & LDR | Smart plant watering signal |
| 38-39 | Servo Motor | Servo-based gate |
| 40-41 | DC Motor with L293D | Mini fan with speed control |
| 42-44 | Capstone Build | Plan, build, debug, polish |
| 45 | Showcase Day | Final demo + viva |
Module Documents
Sub-Module Breakdown
Daily Session Structure (90 Minutes)
| Time | Activity | Purpose |
|---|---|---|
| 0–10 min | Energizer & Recap | Engage students, recall previous session, set the day's goal. |
| 10–30 min | Theory & Concept Demo | Trainer-led concept introduction with live demonstration. |
| 30–75 min | Hands-on Lab Activity | Students build, code, and test in pairs or small teams. |
| 75–85 min | Peer Review & Showcase | Students share what they built and what challenged them. |
| 85–90 min | Wrap-up & Preview | Trainer summarizes, assigns reflection task, previews next session. |
Theory vs Practical Split
| Theory | 30% — ~20 minutes per session, ~13.5 hours over the module |
| Practical | 70% — ~50 minutes per session, ~47 hours over the module |
| Lab Experiments | 16 structured experiments with formal templates |
| Mini Projects | 3 industry-themed mini projects |
| Capstone Project | 1 module-end capstone with full documentation |
Three Lab Experiments in Detail
| Component | Weight | What Is Assessed |
|---|---|---|
| Practical Assessment | 30% | Hands-on lab proficiency, debugging, circuit-building accuracy |
| Project Evaluation | 30% | Mini projects and module capstone — design, build, demo |
| Viva-Voce | 15% | Conceptual understanding and ability to explain what was built |
| Assignments & Worksheets | 10% | Concept reinforcement worksheets and reflection logs |
| Attendance & Participation | 10% | Regularity, peer-collaboration, class engagement |
| Innovation Score | 5% | Originality and creativity demonstrated in the capstone |
Project-Based Learning Structure
- Every experiment is treated as a mini project with a working deliverable.
- Mini projects are scheduled across 2–3 sessions to allow proper build cycles.
- The capstone runs across the final two weeks with planning, building, debugging, polishing, and pitching.
- Every project requires a lab notebook entry: objective, sketch, BOM, observations, conclusion.
- Showcase Day is a public demo with peers, parents, and mentors as audience — building communication skills early.
Curriculum Framework
Module 3 follows the standard Elysium delivery framework — a structured 90-minute daily session, predictable rhythm, and a continuous-assessment philosophy.